Backpacking Michigan’s Pictured Rocks National Lakeshore backcountry is a great way to see this amazing park. The hike will take you to three different campsites, and it can be completed in just three nights!
This blog post will give you all the information you need to plan your trip. I cover everything from what gear to bring, to where to find the best views. So if you’re looking for an adventure, be sure to check out Pictured Rocks National Lakeshore in Michigan’s upper peninsula!
Note: Make sure you’re in shape to hike 7-12 miles per day for this trip.
What to Pack
When backpacking Pictured Rocks National Lakeshore, be sure to consider the season you’ll be backpacking. Other camping gear may be useful to bring, but don’t overdo it. You don’t want to carry unnecessary weight. At the very least, you should bring the following items:
- Backpack with capacity for 4 days worth of gear (35-50 liters)
- Shelter (tent, bivy, covered hammock, or other)
- Sleeping bag rated appropriately for the temperature
- Sleeping pad
- Water treatment + reservoir
- Stove for cooking
- Enough food for three days, plus at least 1 extra day of emergency food
- Sun protection
- First aid kit
- Headlamp or flashlight with extra batteries
- Knife or multi-tool
- Clothing appropriate for the weather
- Navigation aids, including a backcountry map of the area, compass, GPS, personal locator beacon or satellite messenger
- Bear protection – for food, and yourself
The Trip
Where to Start
Be sure to check out the Pictured Rocks backcountry camping site to get information on permits, any alerts or closures, and general information on backcountry camping in the area.
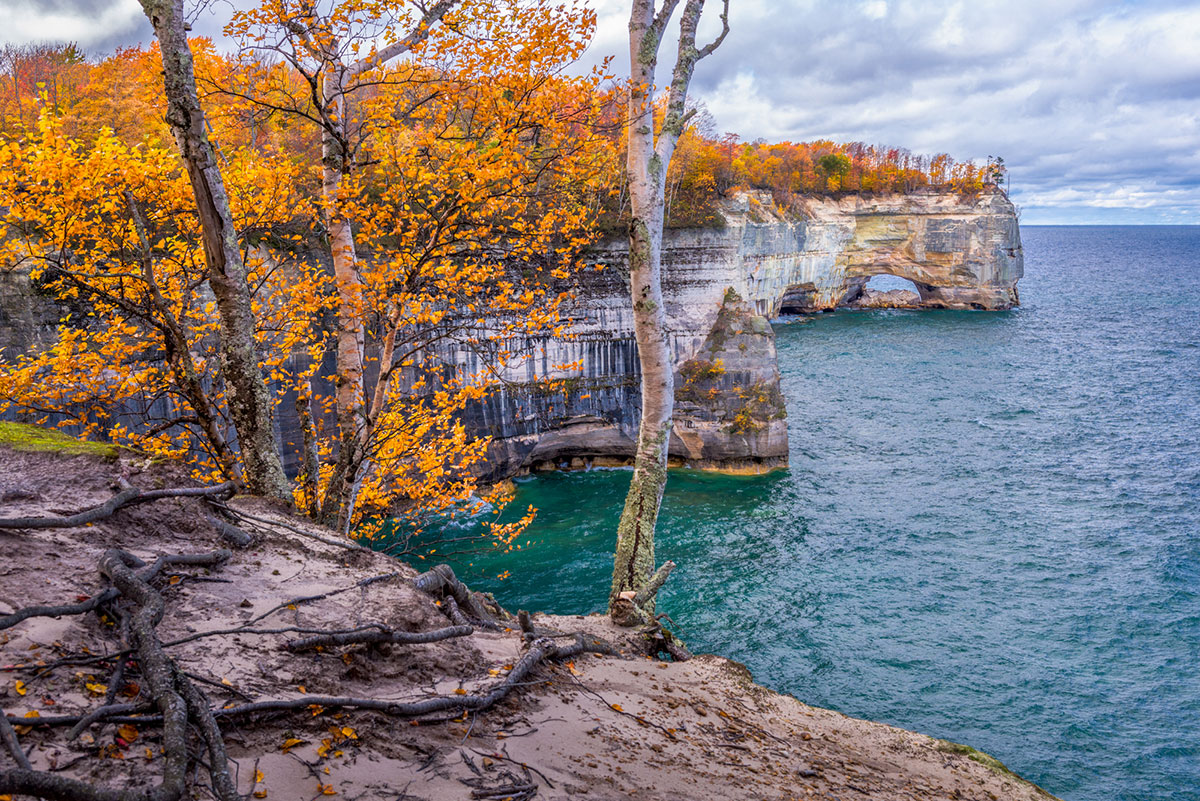
Pro Tip: When planning this trip, consider going in the autumn months to immerse yourself in the beautiful colors of the leaves changing.
For this trip, one of the most convenient amenities is the shuttle service that takes you from your car to the starting point of your trip. This way, you can hike back to your car without worrying about missing a shuttle to go in the opposite direction.
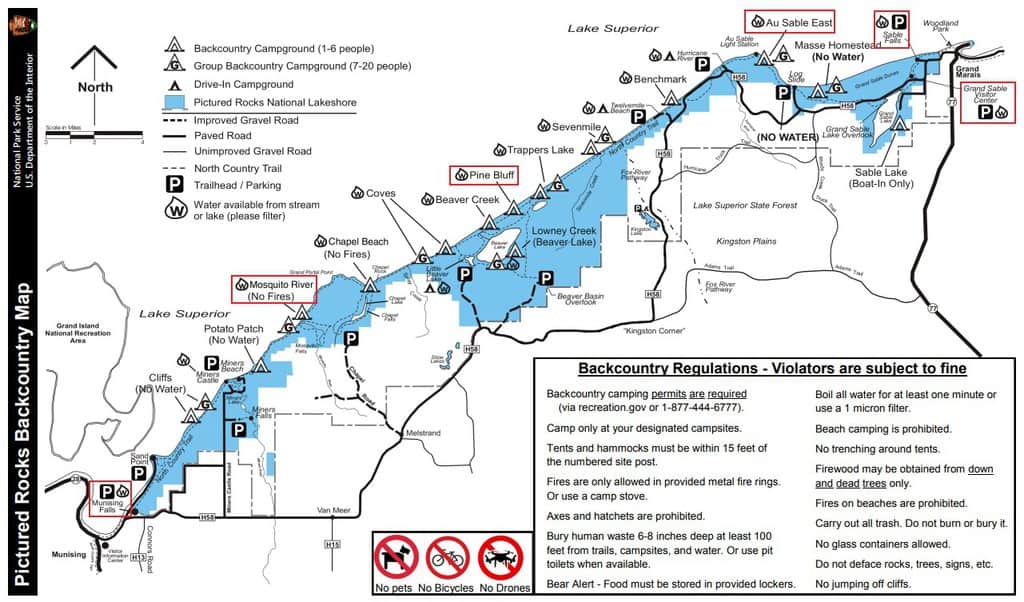
Make shuttle arrangements to drop off your car at Sable Falls or Grand Sable Visitor Center.
From there, take the shuttle to Munising Falls in the morning to start your journey.
Note: This backpacking trip follows tall cliffs. Use caution when hiking along the cliffs!
Day 1: Munising Falls to Mosquito River – 12 Miles
From Munising Falls, you’ll start your first day on a 12 mile journey to the Mosquito River campsite. Right when you start, be sure to check out the Munising Falls, obviously!
Miner’s Castle is one of the most famous landmarks along the coastline. During this section of the hike, you will make your way past Cliffs group and Cliffs backcountry campgrounds before reaching Miner’s Castle. The North Country Trail delivers you to the paved trail at Miner’s Castle Overlook where you’ll see this stunning rock formation.
The Mosquito River campground is on the East side of the Mosquito River where you will set up camp and fall asleep to the calming sound of the water as it makes its way down to empty into Lake Superior.
Day 2: Mosquito River to Pine Bluff – 11.5 Miles
After your first night at Mosquito River, you’ll head off to the Pine Bluff campsite.
Along this leg of the trip, you’ll most notably find Spray Falls, a remote waterfall considered to be one of the most picturesque aspects of Pictured Rocks. The water shoots about 70 feet over the cliffs directly into Lake Superior. The 1856 shipwreck “Superior” is also at the base of the falls. Some days, if you’re lucky, you can even see a rainbow forming here.
Chapel Beach and Chapel Rock are also on this section of the trail. Be sure to take pictures of Chapel Rock! This Cambrian age sandstone was carved by Lake Nipissing high water some 3,800 years ago, and was dubbed Chapel Rock by French explorers. There once was an archway connecting the rock to the mainland, but it collapsed in the 1940s. The lone white pine growing from atop Chapel Rock is estimated to be 250 years old.
Grand Portal Point can also be found along this section and offers one of the best views of the lakeshore. Be sure to stop here for a moment to look out over the water.
Wrap up your day of hiking at the Pine Bluff campsite. There are five campsites in a sandy open area covered in ferns with pine trees scattered throughout. You can also access the beach and Lake Superior from a trail on the bluff at the entrance to the campsite.
Day 3: Pine Bluff to Au Sable East
After the second night of your journey, make your way from Pine Bluff to Au Sable East.
On this stretch, you’ll find Twelvemile Beach and the Au Sable Light Station.
As the name implies, Twelvemile Beach is a 12 mile stretch of Lake Superior beach that explores the natural history of the beach adjacent to the lake – an environment very different from the cliff-side hiking thus far.
After hiking along the beach, you’ll find yourself at the Au Sable Light Station right before you reach your last campsite of the trip. This is an isolated Lake Superior lighthouse. Exposed shipwreck remains dot the shoreline, and the quiet light station gives you a feeling of yesteryear where families lived and worked from 1874 to 1958. Guided tours of the lighthouse are also provided in the summer months!
The Au Sable East campground is just past the light station. The six campsites here are scattered throughout the trees of the dense forest.
Day 4: Au Sable East to Your Transportation – 7 Miles
Finally, you’ll hike from Au Sable East back to the parking lot (either Sable Falls or Grand Sable Visitor Center).
On your way home, you will see Log Slide, where the trail leads through mature hardwoods to the Western edge of the Grand Sable Dunes. Here, logs once slid down to Lake Superior in a wooden chute. The popular overlook platform was destroyed in a winter storm, but the path to the platform location remains. You’ll be rewarded with breathtaking views of Lake Superior, the Grand Sable Dunes, and Au Sable Lighthouse in the distance.
The Sable Falls can be seen up close by taking 168 steps down to the base of the falls. A trail continues past the falls along Sable Creek to a rock beach on Lake Superior. The first landing on the stairs provides a view of Sable Falls, although the best view is from the bottom.
If I haven’t burned you out with this backpacking trip, you should lastly stop in at the Grand Sable Visitor Center to get yourself a souvenir, or learn more about the Pictured Rocks National Lakeshore.
Conclusion
So there you have it – a trip that will take you through some of the best views and hikes Pictured Rocks National Lakeshore has to offer! Whether this is your first backpacking trip or not, I hope you’ll find this information useful. Be sure to prepare adequately for the weather conditions and pack accordingly! I wish you safe and happy trails, and enjoy this trip!


Leave a Reply